
You just have to ... show the finger!
Mar. 25th, 2014 04:48 pmMirama hopes to replace your smartphone with a headset, your camera button with a finger gesture: ... http://ehads.com/mirama-hopes-to-replace-your-smartphone-with-a-headset-your-camera-button-with-a-finger-gesture/?utm_source=twitterfeed&utm_medium=twitter #technology

By Mat Smith Mirama wants do away with the the camera button on your smartphone. In fact, don’t even get the smartphone out to begin with. Its prototype headset lets you frame and take a picture using your hands and its built-in camera. No buttons, no vocal cues,… Source: Tech – Engadget Related PostsMeet Panasonic’s …
#news #hacks

♲ Adam Dachis
Make Your Own Solar Charging USB Battery Pack

If you need a way to charge your gadgets on the go and you're not particularly fond of also having to charge a battery, let the sun do half of the work for you. Instructables user andrea biffi demonstrates how it's not that hard to make your own solar USB battery with four ports.
Read more...


link
Mind your life...
Feb. 18th, 2014 06:19 pm♲ Melanie Pinola
Make a Mind Map to Keep on Top of Everything in Your Life

#hacks
Mind maps are wonderful tools for organizing information and boosting creativity. GTD guru David Allen says that he now maps out his "world" because his lists of projects and actions alone didn't keep him as much on top of everything as he needed.
Read more...


link
Un carro que es tecnología abierta!
Feb. 14th, 2014 06:55 pm#hacks
♲ omeza
Construye este auto Open Source en menos de una hora
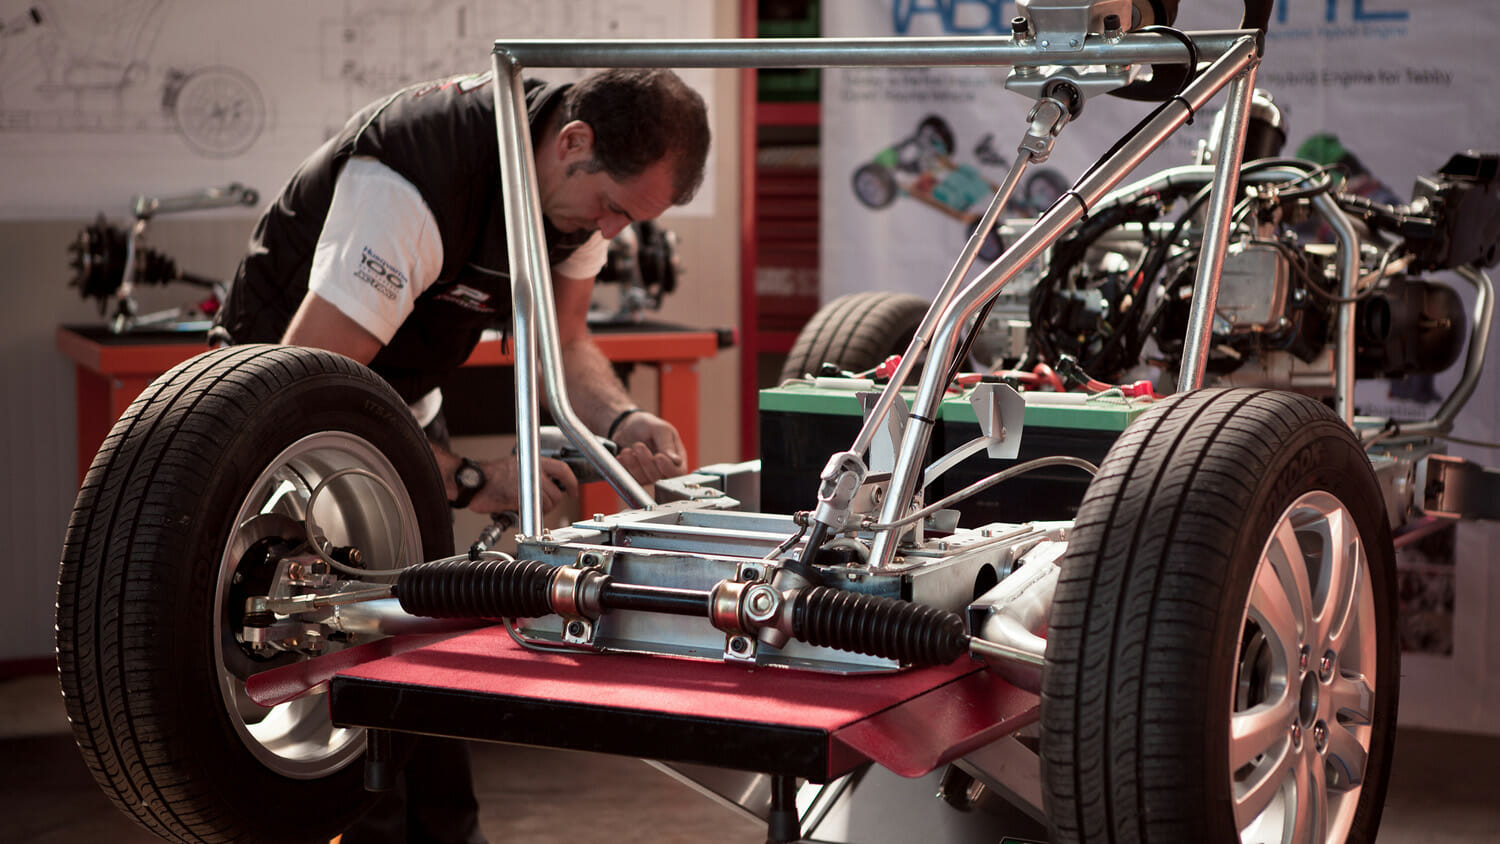
Para los que dicen que el Open Source no tiene potencial, si las Raspberry Pi no te han enseñado todo lo que pueden hacer, hoy vamos a ver otro ejemplo de lo que es capaz:
Tan solo en una hora se construye este carro Open Source, que puedes hacer tu mismo, aunque si eres de los Ingenieros que colaboraron en su diseño puede tomarte un máximo de 41 minutos.
 Estoy hablando del OSVehicle Tabby, claro que esta hora de trabajo no incluye la instalación de objetos superfluos como carrocería, ventanas, rompe vientos, espejos, etc.
Si lo quieres para trabajar, puedes actualizar al Urban Tabby, el cual incluye carroceria, rompe vientos, luces y espejos para hacerlo legal en muchos países.
Los modelos actuales alcanzan una velocidad de 70 – 90 km/h, lo cual no esta nada mal para darte un paseito
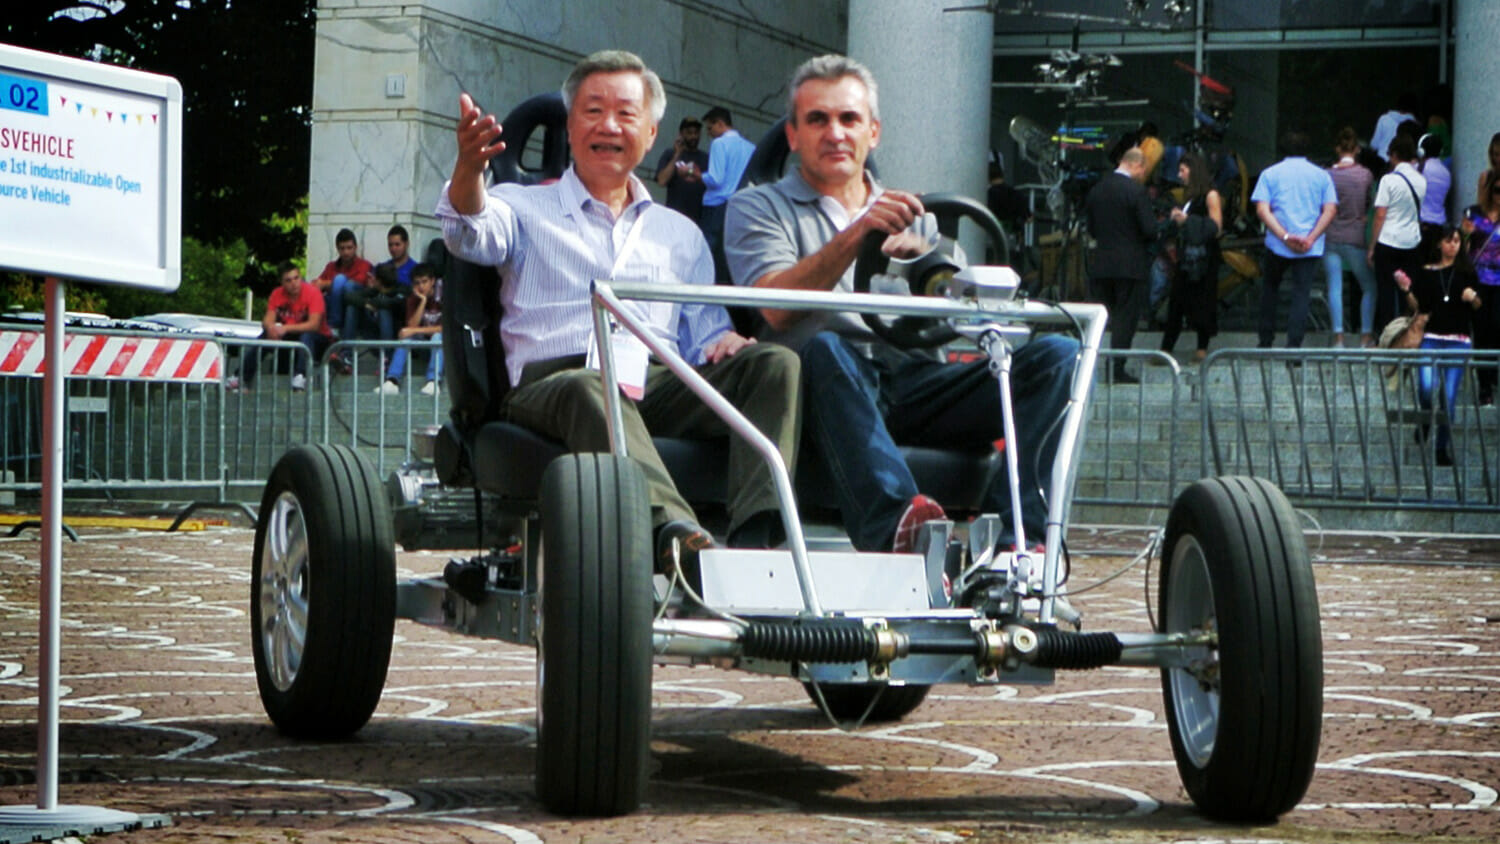 En total el costo de este vehículo es de 4,000 – 6,000€ según el modelo, o en dolares $5,350 – $8,000, y te lo llevan desarmado a la puerta de tu casa.
Ideal para esas tardes en las que no sabes que hacer
link
Laser Headlights Promise More Intense, Controllable Beams
cartechboy writes "Soon, your new car's headlights will be powered by lasers. The 2015 BMW i8 is entering production, and it's the first vehicle to offer laser headlights. These new beams offer a handful of advantages over LED lighting, including greater lighting intensity and extending the beams' reach as far as 600 meters down the road (nearly double the range of LEDs). The beam pattern also can be controlled very precisely. Plus, laser lights consumer about 30 percent less energy than the already-efficient LED lights. Audi is among the short list of other auto manufacturers to promise laser lights in the near future. But the coolest part of all this? When you turn on a set of these new headlights, you'll be able to scream, 'fire the lasers!'"
Read more of this story at Slashdot.

#hacks
Cuando calienta el sol
Jun. 4th, 2013 05:43 pmMe llegaron los paneles solares y el controlador de carga. Lo primero que hice fue probar los paneles y como pueden observar a la luz azul al lado izquierdo de el panel, que éstos están funcionando. Todo esto indica que...

Paneles Solares
Es tiempo de ensamblar!
Ensamblando el generador
Ensamblar el generador es trivial ya que estoy utilizando el controlador de carga. El controlador me permite utilizar el generador de forma automática y me libera de la tarea de tener que echarle un ojo al voltímetro de vez en cuando con tal de asegurarme que la batería no se sobre o bajo cargue. Pero, si no hay un controlador de carga, no es un impedimento para su fabricación y uso. Simplemente, no es tan conveniente. Primero que nada, así es como se conecta las partes al controlador de carga:

Esquemático de cableado utilizando el controlador de carga
Como puede ver es bien sencillo. Esto es por que el controlador que yo adquirí contiene los conectores necesarios. Ésto me libera el tener que soldar los cables con conectores. Así que para conectarlo todo:
- El cable de los paneles solares se conectan al puerto de el panel en el controlador de carga.
- Los cables de la batería se conectan al puerto de la batería del controlador de carga.
- El conector de 12 voltios y el voltímetro se conectan al puerto de carga ("load") de el controlador carga.
Pero, ¿Qué pasaría si no hubiese un controlador de carga? Bueno, la forma en que se conecta es conectando todos los componente en paralelo a la batería. Así que su no hubiese un controlador de carga, así sería la forma en que se conectaría.

Cableado del generador sin el controlador de carga
Los pasos serían de esta manera:
- El cable positivo de el panel al nodo positivo de la batería. El cable negativo del panel al nodo negativo de la batería. Si hubiese mas de un panel solar, el cableado sería idéntico.
- Las cargas, en este caso el conector de 12 voltios, se conectan de la misma forma. Positivo de la carga al positivo de la batería, el negativo con el negativo de la batería.
- El voltímetro es de por sí una especie de carga. Éste se conecta de la misma manera: Positivo con positivo y negativo con negativo.
El controlador de carga hace el mismo tipo de conexión en paralelo con la diferencia de que éste tiene un circuito que corta la corriente cuando se requiere. Existen muchos diagramas en el Internet que explica el funcionamiento de el controlador, pero son mas allá del propósito de esta explicación.
¿Y como luce?
La imagen no es bonita, pero limpia

Cableado interno
¿Y que es todo esto?
- La caja azul es el controlador de carga.
- La caja negra a la derecha es la batería.
- Los tapones eléctricos se usan para conectar el conector automotriz de 12 voltios y el voltímetro al controlador. El controlador tiene un conector automotriz de 12 voltios y yo tenía un conectora la mano.
- El cable a el panel solar esta dirigiéndose a la derecha.
- La cosa roja a la esquina superior izquierda es mi máquina de sacar nieve y no es parte del proyecto.
:).

El sistema completo
Y así es como luce "de afuera". Aunque está completo, hay par de detallitos por cubrir. Éstos son:
- Asegurar el controlador a la caja.
- Asegurar la batería
- Un cordón elástico para sujetar el generador.
Los siguientes programas de código abierto fueron utilizado para escribir esto:
- GNU Emacs como editor
- Plant UML para generar las imágenes
- Muse Mode para escribir y generar lo escrito en "Markdown"
I am walking on sunshine
Jun. 4th, 2013 05:40 pmI am walking on sunshine
Well, I got the new solar panels and the charge controller. The first things was to test the panels, which they seem to be working just by looking at the blue light on the left. These were being tested in the garage and receiving light from a window. This also means...

Panels
It is wiring Time!
Assembling the generator
Wiring is dead easy because of the use of the charge controller. Using the charge controller allows for the automatic operation of the generator. It frees you the chore of looking at the voltmeter every so often to take care of the battery. However, not having a charge controller is not an impediment to build it and wiring is also very easy. It is not as convenient to use. First, how it gets wired with the charge controller.

Generator Wiring with Charge Controller
As you see, it is dead easy. This is because the charge controller comes with the connectors to hook everything without the need of soldering cables. Hence, to connect:
- The solar panel wires go to the panel port in the charge controller.
- The battery wires go to the battery port in the charge controller.
- The socket and voltmeter go to the load port in the charge controller.
But what if you are not that lucky? Well, all the connections are in parallel in respect to the battery, therefore, if you do not have a Charge Controller this is the way that it should be wired:

Generator Wiring Without Charge Controller
The steps would be like this:
- Positive of the solar panel to the positive to the battery, negative of solar panel to the negative to battery. If we have more than one solar panel, this would be wired the same way.
- Loads, in this case, the 12 volt socket, would be wire the same. Positive of the load to the positive of the battery, negative of the load to the negative of the battery.
- The voltmeter is a special kind of load, but it still a load. Therefore, the wiring is the same: Positive with positive, negative with negative.
The charge controller wires the same thing, the only difference is that it has circuitry to shut the current as needed. How this is done is beyond the scope of exercise, but there are plenty places on the web that explain how.
How does it look?
The actual picture is not as pretty even though it is fairly clean:
Internal wiring
So what's all this?
- The blue thing is the charge controller.
- The big black box on the right is the battery
- The electric wiring caps are to connect the port, the voltmeter to the charge controller. The load controller has a 12 volt car socket. I was lucky to have a spare connector to connect the load and the voltmeter.
- The connection and cable to the solar panel is on its way on the right.
- The red thing on the upper left is my snow blower, that's not part of this
:).

The whole system
This is how it looks "from the outside". Even though it is complete, there are still some missing items:
- I need to secure the charge controller to the box.
- I need to secure the battery
- I need a bungee cord to secure the generator box.
The following open source programs were used to write this:
- GNU Emacs to write this
- Plant UML to generate the images
- Muse Mode to write and generate the markdown
The work so far
May. 27th, 2013 02:40 pm
The work so far
This is how the main box of the portable solar generator looks like. The only thing that it is missing is the wiring. This is because I am waiting for a larger solar panel that I needed to buy being that the small "trickle charging" one was too small to reach peak charging voltage of 14 volts. The battery is not large, it is only rated at 8 Amp/Hour, but it seems that it needs more "juice".
So what's this?
- A large battery box to house everything. Well, everything needs to be put together somehow
:) - The left dial is the volt meter. This is needed to make sure that you do not under or overcharge the battery. However, this is mostly as an alternate monitoring artifact because the new array comes with a charge and discharge controller. I purchased a charge controller that I am using "for trials" but in all fairness, it would have been inconvenient to be looking at the dial every so often before disconnecting the load.
- The right side is a 12 volt socket. This is a car 12 volt socket being that most of the 12 volt appliances available the USA use this type of socket. If you go to http://aliexpress.com and you look for the Chinese made solar generator, they are using your barrel type connector, similar to the ones used to connect to small electronics. Their approach gives their devices a smaller footprint.
After this, I need to wire the solar panels and the batteries, that's not a lot of work, but it will have to wait until all the pieces are at hand.
El trabajo hasta ahora
Aquí esta la caja principal de el generador solar portátil. Lo que le falta es el alambrado por dentro. La razón es debido a que tuve que comprar un panel solar de mayor capacidad ya que el de carga a cuenta gotas no estaba generando lo suficiente para poder cargar la batería (pila seca) a un voltaje pico de 14 voltios. La batería de por si no es grande y tiene una capacidad de 8 Amperios/Hora.
Lo que usted ve es lo siguiente:
- Una caja de batería. Todo tiene que estar empacado de alguna manera
:). - A la izquierda es un voltímetro. Esto es necesario para asegurarse que la batería no sea sobre y bajo cargada. Sin embargo este voltímetro es una forma alterna para asegurar la salud de la batería ya que los nuevos paneles contienen un controlador de carga y descarga. Yo había comprado un controlador que sólo controlaba la carga a la batería. Pero con sólo este dispositivo hubiese sido obligatorio el tener que mirar a el voltímetro de vez en cuando para asegurarse que la batería no se sobre descargue. No muy conveniente.
- En el lado derecho es un conector de 12 voltios, de los mismos que se usa en automóviles. Esto hace disponible el uso de dispositivos de 12 voltios que están en el mercado en los Estados Unidos. Sin embargo, si usted se observa en la página de Ali Express (http:://aliexpress.com) y busca por generadores solares, usted observará que el tipo de conector usado es similar a lo que se usa para conectar fuentes de alimentación eléctrica a dispositivos electrónicos pequeños. Esto hace que los generadores ocupen menos espacio.
Después de todo esto, solamente requiero conectar los paneles y la bateria, lo cual no es mucho esfuerzo. Pero requiere que tenga los componentes a la mano para terminar.
Garden in a pot!
Mar. 22nd, 2013 05:02 pmNo space?
No problem!
http://wakeup-world.com/2012/08/20/no-garden-here-are-66-things-you-can-can-grow-at-home-in-containers/
Generate Lorem Ipsum in newLisp
Nov. 13th, 2012 03:10 pm;; This code is in newLisp ;; ;; Use the lipsum generator to generate Lorem Ipsum dummy paragraphs / words / bytes. ;; ;; Lorem Ipsum courtesy of www.lipsum.com by James Wilson ;; ;; @param what in "paras","words","bytes"] ;; @param amount of paras/words/bytes (for words minimum is 5, for bytes it is 27) ;; @param start always start with 'Lorem Ipsum' "true"/"false" (define (lipsum what amount start) (setq lipsum-buffer (get-url (format "http://www.lipsum.com/feed/xml?what=%s&amount=%d&start=%s" what amount start))) (setq lipsum-list (xml-parse lipsum-buffer 7)) (nth 1 (first (nth 2 (first (nth 2 (first lipsum-list))))))) (lipsum "paras" 2 "true")
My Wiki Farm!
Nov. 12th, 2012 11:44 pm
Got the wikifarm going! It's kind of working, but it's working :). It has been a pain doing it with two different web servers, but it has been fun.
This is the setup:
- Server A
-
- Mysql Server
- Apache Server
- Server B
-
- Mysql Client
- Lighttpd Server
It's still getting sort of confused, but for the most part it's doing the right thing.
